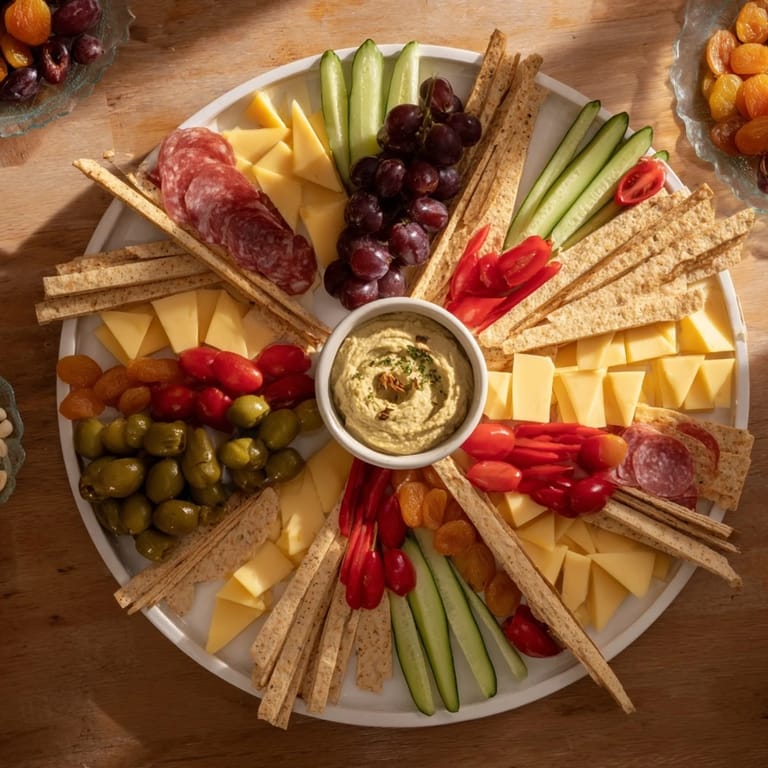
 Pin
Pin I still remember the dinner party where my friend Sarah pulled out this stunning arrowhead board, and I watched guests literally follow the visual arrows she'd created with cheese and cured meats, all pointing toward a creamy dip in the center. It was the first time I realized that a charcuterie board could be more than just food arranged on wood—it could tell a story, guide people, and spark conversation the moment they saw it. That night, I became obsessed with the idea of arranging food with intention, and the Arrowhead Directional Board has since become my secret weapon for making any gathering feel special.
There's something magical about watching people discover this board at a party. I made one last summer for my sister's birthday, and instead of the usual chaos of people grabbing from different spots, everyone naturally followed the visual flow toward the center. Kids, adults, even my skeptical uncle who usually ignored appetizers—they all engaged with it like it was an edible work of art. That's when I knew this wasn't just a board; it was an experience.
Ingredients
- Aged cheddar, cut into triangles (100 g): The sharp bite of aged cheddar is what makes this board memorable. Cut into triangles so the points naturally guide toward your dip—this isn't just practical, it's the foundation of the whole concept.
- Brie, sliced into wedges (100 g): Brie's creamy softness balances the harder cheeses and gives guests that luxurious mouthfeel. Slice it thickly enough that wedges hold their shape but thin enough to be elegant.
- Gouda, cut into strips (100 g): Gouda's subtle sweetness is the secret weapon that ties the salty and savory elements together. Cut it into long strips so it creates beautiful directional lines on your board.
- Prosciutto, folded (100 g): Fold each slice loosely so it catches light and creates dimension. The delicate saltiness is the perfect bridge between cheese and vegetables.
- Salami, sliced and folded (100 g): Choose a quality salami with visible spice or peppercorns for visual interest. The folding technique makes thin slices stand up and point.
- Seedless grapes in small clusters (1 cup): Keep grapes in their natural clusters when possible—they're already arrow-shaped and practically beg to point toward the center.
- Cherry tomatoes, halved (1 cup): Halving them creates little flat edges that catch light beautifully and adds a fresh, juicy contrast to rich cheeses.
- Cucumber, sliced diagonally (1 small): Diagonal slices are longer and naturally point better than straight cuts. The cool crispness is essential for balance.
- Red bell pepper, sliced into strips (1 small): The bright color is your visual anchor. Thin strips orient perfectly toward your dip center.
- Artisan crackers (1 cup): Choose crackers with interesting shapes and slight angles—they're easier to orient directionally than perfectly square ones.
- Baguette, sliced on the bias (1 small): The bias cut is everything here. It creates natural points and the longer slices are easier to arrange directionally.
- Marcona almonds (½ cup): Their buttery, slightly sweet character is gentler than regular almonds. They fill gaps beautifully and their oval shape suits the directional aesthetic.
- Dried apricots (¼ cup): The slight tang and natural sweetness are your palate cleansers. They're chewy enough to hold their position between other elements.
- Olives (¼ cup): A small amount goes a long way for visual intrigue. Pit them for guests if you can—it's a thoughtful touch that says you care.
- Herbed hummus or whipped feta dip (about 100 ml): This is your focal point. Choose or make a dip that's creamy enough to scoop easily but flavorful enough to deserve center stage.
Tired of Takeout? 🥡
Get 10 meals you can make faster than delivery arrives. Seriously.
One email. No spam. Unsubscribe anytime.
Instructions
- Set Your Focal Point:
- Place your dip bowl at one end of the board—corner or edge works beautifully. Pour your dip into the bowl and take a step back. This is your arrow's point, the destination everything else will guide toward. Imagine invisible lines radiating from this bowl across your entire board.
- Create Your Cheese Foundation:
- Start with the aged cheddar triangles, arranged with their points all facing toward the dip. Fan them out from the opposite end of the board, creating the main body of your arrow. You're not placing them randomly—each triangle should feel like it's pointing with intention. Add brie wedges next, nestling them between cheddar pieces. Their natural wedge shape makes this almost effortless. Finally, arrange the gouda strips in long lines that all flow toward the center.
- Layer in the Meats:
- If you're using meats, fold each slice loosely and position them in lines that guide toward your dip. Think of these as the next layer of direction, reinforcing the visual path you've created. They should weave between cheeses, not replace them.
- Orient Your Vegetables:
- Now comes the sensory contrast. Lay cucumber slices diagonally—the angle matters. Arrange bell pepper strips in radiating lines. Scatter halved cherry tomatoes so their flat sides face slightly upward, catching light. Group grapes in their natural clusters, all pointing the same direction. This is where the board starts to feel alive.
- Position Crackers and Bread:
- Bias-cut baguette slices are your best friend here. Lay them in curved lines that follow your overall arrow shape, all tilted toward the dip. Scatter artisan crackers in the gaps, rotating each one so it feels part of the directional flow, not just filler.
- Fill and Refine:
- This is the meditative part. Scatter nuts and dried fruit along the lines between main components, using them to reinforce the directional pattern. A few almonds here, apricots there, olives tucked into strategic spots. Step back frequently. Does the eye naturally travel toward the dip? If not, adjust. This is where patience transforms arrangement into art.
- Final Balance Check:
- Look at your board from above. There should be an undeniable arrow shape formed by the arrangement of all your elements. No dead zones, no awkward gaps. Everything should feel intentional and beautiful. Make final micro-adjustments until it feels right—trust your eye.
 Pin
Pin My favorite moment with this board was watching my mom, who always feels overwhelmed planning parties, see the finished arrangement and actually relax. She said it felt like the board was doing half the work of hosting. That's what got me—this board doesn't just feed people, it actually reduces anxiety and makes the person serving feel proud and capable.
The Psychology of Pointing
There's a reason this board works so well at parties, beyond just looking stunning. Our brains are wired to follow visual cues and directional lines. When every element on your board points toward the dip, you're actually using composition and psychology to influence how people interact with your food. Guests unconsciously move toward the center, sample more thoughtfully, and spend more time admiring before eating. It transforms a snack board into an interactive experience, and that's the real magic.
Adapting This Board to Your Crowd
The beauty of the arrowhead concept is that it works with almost any dietary preference or flavor profile. For vegetarians, simply omit the meats and double down on cheeses or add marinated artichoke hearts and roasted red peppers—they point beautifully too. Want to make it more Italian? Use fresh mozzarella, prosciutto, and basil. Going Spanish? Manchego, chorizo, and roasted peppers. The directional principle stays the same; only the ingredients change. I've made versions for cheese lovers, vegetarians, and even a kid-friendly version with milder cheeses and more fruit. The arrow concept adapts elegantly to anyone's needs.
Building Your Confidence
The first time you make one of these, it might feel intimidating. You're probably going to rearrange things five times, second-guess your layout, and wonder if it actually looks as good as you think. That's completely normal, and honestly, it's part of the process. Once you place that dip bowl and realize that single decision creates the entire organizational principle, something clicks. You're not arranging random foods anymore; you're telling a visual story. Every element has purpose. And that confidence—that feeling of creating something intentional and beautiful—that's something you'll carry forward into every board you make from that point on.
- Start with that dip bowl placement and let everything else flow from that decision.
- Remember that imperfection is charming; perfectly uniform slices look sterile, but naturally varied thickness looks intentional and artisanal.
- The arrangement should take about 20-25 minutes for your first board, maybe 10 minutes once you've done it a couple times.
 Pin
Pin Every time I make this board, I think about the moment someone notices the intentionality of the design and smiles. That's the real ingredient here—the care and creativity you pour into your gathering. The arrowhead isn't just a design; it's an invitation.
Recipe Q&A
- → How are the components arranged on the board?
All items are angled so their points or shapes direct attention toward the dip bowl, creating a visually dynamic flow across the board.
- → Can this board be adapted for vegetarians?
Yes, simply omit the meats and add more cheese or vegetable varieties to maintain balance and variety.
- → What types of dips work well with this arrangement?
Herbed hummus, whipped feta, beet hummus, tzatziki, or whipped ricotta all pair well and complement the flavors effectively.
- → What tools are recommended for assembling the board?
Using a large wooden or slate board, paring knife, small bowls for dips and olives, and cheese knives will help create neat, precise arrangements.
- → How should textures and colors be considered?
Contrasting colors and textures like crisp crackers, smooth cheeses, and fresh produce enhance visual interest and balance.