 Pin
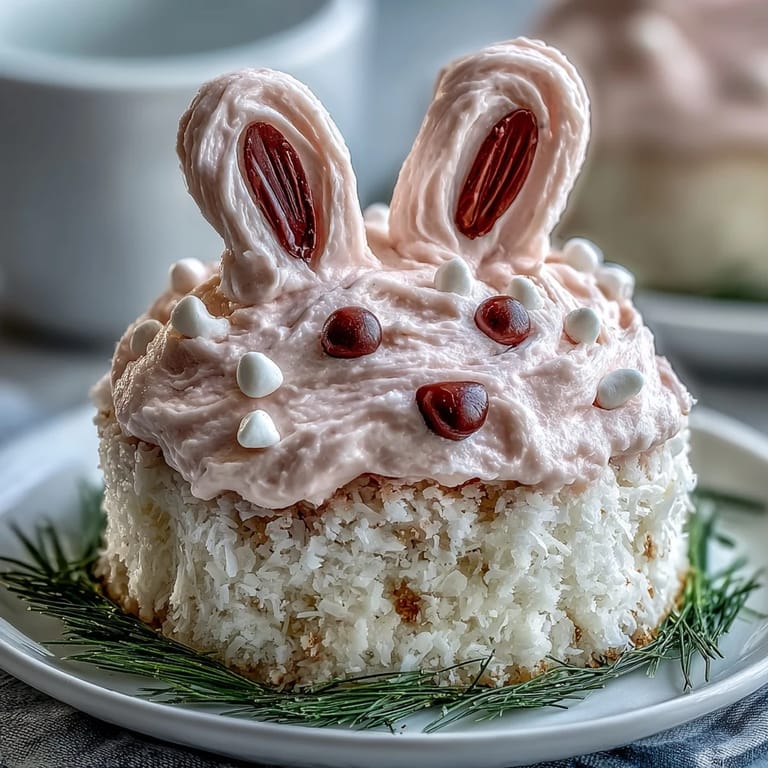
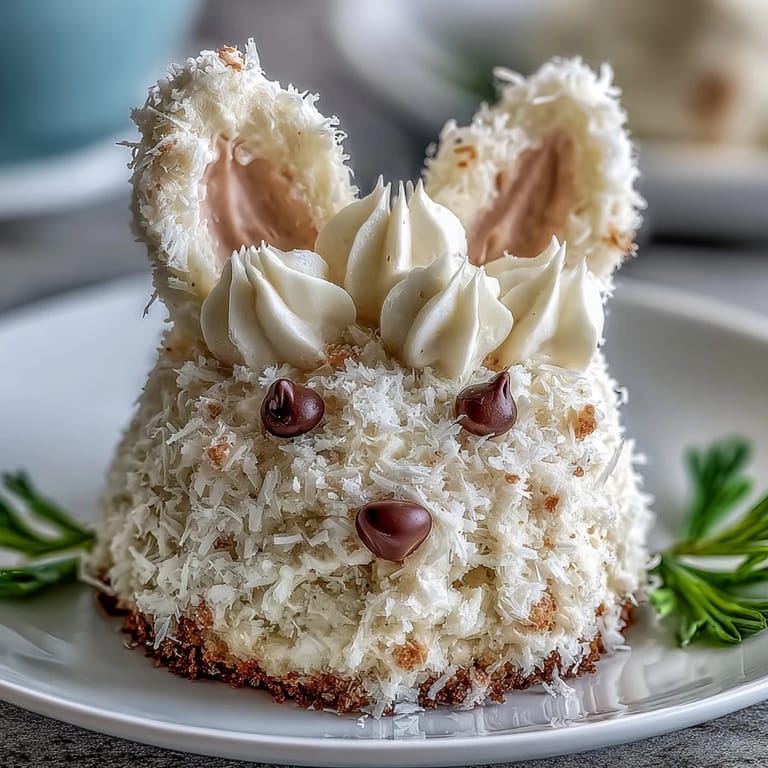
Pin My daughter came home from school one Tuesday clutching a flyer about the Easter party, and suddenly I was that mom scrambling for something special. These little bunny cakes landed in my head while I was doing dishes, and I realized they were exactly what a six-year-old's eyes light up for—not because they're complicated, but because they look like tiny edible friends staring back from a platter. The vanilla sponge is cloud-soft, the buttercream takes whatever color you dream up, and honestly, letting her decorate them turned a Tuesday night into something neither of us expected.
What I didn't expect was how quiet the room got when we arranged them on that platter—even my usually loud kitchen filled with this small, focused energy. My daughter was positioning each bunny like they were going to a tiny tea party, and her little brother kept sneaking chocolate chips meant for eyes. Those cakes became the thing her classmates actually remembered, not just sugar and frosting, but proof that someone made something just for them.
Ingredients
- All-purpose flour (1 1/2 cups): This is your structure, so measure it by spooning into the cup and leveling off—I learned the hard way that scooping directly makes them dense.
- Granulated sugar (1 cup): Creaming it with butter is where the magic starts; don't rush this part.
- Unsalted butter (1/2 cup for cakes, plus 1/2 cup for buttercream): Room temperature is non-negotiable or you'll fight the mixer the whole time.
- Whole milk (1/2 cup plus 2 tbsp): Cold milk right from the fridge works fine; it doesn't need to be special.
- Large eggs (2): Room temperature eggs blend smoother into the batter, though honestly room temperature is just warmer than cold, not warm warm.
- Baking powder (1 1/2 tsp): Check the date on your tin; old baking powder is a silent cake killer.
- Salt (1/4 tsp): This tiny amount makes the vanilla taste more vanilla, trust it.
- Pure vanilla extract (1 tsp for cakes, 1 tsp for buttercream): The real stuff matters here; imitation gets lost between the butter and sugar.
- Powdered sugar (2 cups sifted): Sifting takes thirty seconds and saves you from lumpy buttercream.
- Food coloring: Gel colors are stronger than liquid, so you use less and don't thin out the buttercream.
- Mini marshmallows: Cut them in half lengthwise for ears that actually look like ears.
- Pink candy-coated chocolates and mini chocolate chips: These become personality—the nose and eyes that make each bunny feel different.
- White chocolate chips or candy melts for teeth: Optional but they add that little detail that makes kids lean in closer.
- Shredded coconut or green sprinkles: The grass underneath makes it a whole scene, not just a cake.
Tired of Takeout? 🥡
Get 10 meals you can make faster than delivery arrives. Seriously.
One email. No spam. Unsubscribe anytime.
Instructions
- Get Your Oven Ready:
- Preheat to 350°F and grease your muffin tin or line it with paper liners—this step done ahead means one less thing to think about when the batter's mixed and waiting.
- Start the Cream:
- Beat butter and sugar together until it's pale and fluffy, about two to three minutes—you'll hear the mixer lighten up and see the mixture transform from yellow to something almost white. This is what gives the cake its tender crumb.
- Welcome the Eggs:
- Add eggs one at a time, beating after each one so they blend completely before the next arrives. The vanilla extract goes in now, filling your kitchen with that vanilla-extract-on-a-Tuesday smell.
- Combine Dry Ingredients:
- Whisk flour, baking powder, and salt in a separate bowl so there are no hidden pockets of baking powder waiting to surprise you. This takes maybe a minute.
- Alternate and Fold:
- Add half the dry mix, then half the milk, then the rest of each, mixing just until combined—overworking develops gluten and makes the cake tough instead of tender. You'll know it's right when you can't see streaks of flour anymore.
- Fill the Tin:
- Divide batter among muffin cups, filling each about two-thirds full so they rise up but don't overflow into their neighbors. A small ice cream scoop makes this fast and even.
- Bake Until Golden:
- Pop them in for 18–20 minutes; a toothpick through the center should come out clean or with just a few crumbs clinging. They'll smell ready before they look ready.
- Cool Completely:
- Let them sit in the tin for five minutes, then transfer to a rack—this matters because frosting warm cake is like trying to ice a puddle.
- Make the Buttercream:
- Beat softened butter until creamy, then gradually add sifted powdered sugar so it doesn't cloud your kitchen. Add milk and vanilla, then beat until it's fluffy enough to hold peaks.
- Color Your Dreams:
- Divide buttercream and tint with food coloring—a toothpick dipped in gel color goes a long way, so start small and add more if you need deeper shades.
- Frost Each Cake:
- Spread or pipe buttercream on top of each cooled cake, and this is where you can go simple or fancy.
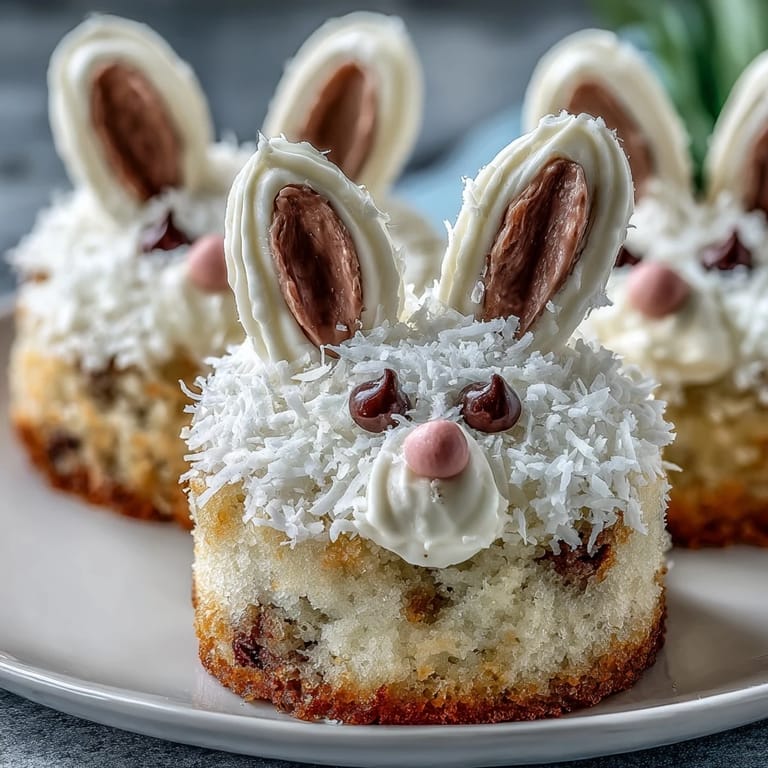
- Decorate Like You Mean It:
- Cut marshmallows in half for ears, push them into the frosting, add pink candies for noses and chocolate chips for eyes, and use white chocolate or candy melts for teeth if you want them. The coconut or sprinkles become grass underneath.
- Make It a Scene:
- Arrange them on a platter dusted with extra coconut or sprinkles, and suddenly you have not just cakes but a whole Easter meadow.
 Pin
Pin What struck me most was how these tiny cakes became tiny edible people in my daughter's mind, and suddenly the Easter party wasn't about showing up with a treat but about showing up with something that had personality. That matters in ways that surprise you when you're standing in a school gym watching a kid hold their bunny cake like it's a small treasure.
The Softness Secret
Vanilla cake gets a reputation for being boring, but that's only true if you don't protect the moisture. The ratio of butter to flour here, plus the way you fold in the dry ingredients, keeps these cakes tender days later—I've left them uncovered on the counter and they stayed soft, which is genuinely unusual.
Decorating Without Stress
I used to think cake decorating required steady hands and years of practice, but these bunnies proved me wrong. Marshmallow ears don't need to be perfect to look right, and when you've got candy eyes and a pink chocolate nose, minor wobbles just add character. The beauty is in the simplicity, and that's what makes them work for kids to decorate too.
Making These Your Own
Once you make them once, you realize how flexible they are—different frosting colors change the whole vibe, swap chocolate cake for vanilla if you want, and honestly the decoration is whatever makes you smile when you look at it. My neighbor made hers with orange buttercream and called them Easter bunnies on alert, which was exactly as funny as it needed to be.
- If you're making these ahead, frost and decorate them the morning of or the night before so the buttercream sets and holds the candies.
- Marshmallows can be stubborn, so poke holes in the frosting first and push the ears in at an angle for better grip.
- Kids decorating their own means a few will be lopsided masterpieces, and that's the version people actually remember.
 Pin
Pin These cakes remind me that sometimes the most memorable things are the small, silly ones made with intention. They're proof that you don't need complicated techniques or fancy ingredients to create something that lands in someone's memory.
Recipe Q&A
- → What type of flour works best for these cakes?
All-purpose flour is recommended for a light and tender crumb.
- → How can I achieve vibrant buttercream colors?
Use gel or liquid food coloring and mix thoroughly until the desired hue is reached.
- → Can I prepare the cakes ahead of time?
Yes, bake in advance and store in an airtight container; frost and decorate just before serving.
- → What alternatives exist for the vanilla flavor?
Substitute with almond or lemon extract for a different but complementary taste.
- → How do I ensure the decorations stick well?
Apply decorations immediately after frosting while the buttercream is soft and slightly tacky.